Some links to download Visio stencils of the few most popular vendors.
Juniper
Cisco
Avaya
BlueCoat
Fortinet
Dell
Checkpoint happen not to have official stencils set, only Nokia appliances stuff can be found. So someone volunteered and using icons/press releases/PowerPoint presentations done by the Checkpoint turned it into the Visio stencils:
fireverse.org
If nothing else helps here you can find the rest:
nag.ru/projects/visio
Showing posts with label Checkpoint. Show all posts
Showing posts with label Checkpoint. Show all posts
CheckPoint SecureClient Ports
* protocol 50 for ESP
* UDP 2746 for UDP Encapsulation
* TCP 18231 for Policy Server logon/FW1_pslogon_NG
* UDP 18233 for Keepalive protocol/FW1_scv_keep_alive
* TCP 18232 for Distribution Server/FW1_sds_logon
* UCP 259 for MEP configuration-RDP
* UDP 18234 for performing tunnel test when the client is inside the network
* TCP 18264 for ICA certificate registration-FW1_ica_services
* UDP 500 for IKE
* TCP 500 for IKE over TCP
* UDP 4500 for IKE and IPSEC (NAT-T)
* TCP 264 for topology download
* UDP 2746 for UDP Encapsulation
* TCP 18231 for Policy Server logon/FW1_pslogon_NG
* UDP 18233 for Keepalive protocol/FW1_scv_keep_alive
* TCP 18232 for Distribution Server/FW1_sds_logon
* UCP 259 for MEP configuration-RDP
* UDP 18234 for performing tunnel test when the client is inside the network
* TCP 18264 for ICA certificate registration-FW1_ica_services
* UDP 500 for IKE
* TCP 500 for IKE over TCP
* UDP 4500 for IKE and IPSEC (NAT-T)
* TCP 264 for topology download
How to debug a CheckPoint VPN Connection
vpn debug trunc
vpn debug ikeon
vpn debug ikeoff
vpn debug ikeon
vpn debug ikeoff
- Logs will be in: $FWDIR\log\ike.elg
- Can also use CheckPoint "IKEView" tool to parse ike.elg.
Checklist for adding new interface on a CheckPoint FW
Checklist for adding a new CheckPoint Interface:
- Add to Toplogy on Firewall/Cluster Object in SmartDashboard
- Add necessary routes
- Add no-nat for new network
- Add new network to appropriate anti-spoofing object groups
- Add to Toplogy on Firewall/Cluster Object in SmartDashboard
- Add necessary routes
- Add no-nat for new network
- Add new network to appropriate anti-spoofing object groups
CheckPoint Failover Commands
Fail to FAILED:
cphaprob -d faildevice -s problem report
Fail to OK:
cphaprob -d faildevice -s ok report
Check sync stat:
cphaprob syncstat
cphaprob -reset syncstat
Troubleshoot:
fw ctl pstat
cphaprob -i list
-----------------------
Easier method to fail over:
cphastop (primary)
then cphaprob state (secondary)
then cphastart (primary)
should come back as primary standby.
Modify Failover Timeouts:
cphaprob -i list
cphaprob -d fwd -t 45 -s ok -p register
cphaprob -d cphad -t 15 -s ok -p register
cphaprob -d faildevice -s problem report
Fail to OK:
cphaprob -d faildevice -s ok report
Check sync stat:
cphaprob syncstat
cphaprob -reset syncstat
Troubleshoot:
fw ctl pstat
cphaprob -i list
-----------------------
Easier method to fail over:
cphastop (primary)
then cphaprob state (secondary)
then cphastart (primary)
should come back as primary standby.
Modify Failover Timeouts:
cphaprob -i list
cphaprob -d fwd -t 45 -s ok -p register
cphaprob -d cphad -t 15 -s ok -p register
How to run a CheckPoint Debug
fw ctl debug 0
fw ctl debug -buf 10000
fw ctl debug -m drop conn packet
fwaccel dbg -m general all
fw ctl kdebug -f >& fwconnchain.elg
Ctrl+C to stop the debug
fw ctl debug 0
NOKIA:
fw ctl debug 0
fw ctl debug -buf 8192
fw ctl debug + conn link drop
fw ctl kdebug -f >& fwconnchain.elg
fw ctl debug 0
fw ctl debug -buf 10000
fw ctl debug -m drop conn packet
fwaccel dbg -m general all
fw ctl kdebug -f >& fwconnchain.elg
Ctrl+C to stop the debug
fw ctl debug 0
NOKIA:
fw ctl debug 0
fw ctl debug -buf 8192
fw ctl debug + conn link drop
fw ctl kdebug -f >& fwconnchain.elg
fw ctl debug 0
List the Top Connections on a CheckPoint Firewall
fw tab -t connections -u -f >> conns.txt
cat conn-ips.txt | sort | uniq -c | sort -n
cat conn-ips.txt | sort | uniq -c | sort -n
Clear CheckPoint NAT and State Table
fw tab -t sam_blocked_ips -x
fw tab -t fwx_alloc -x
fw tab -t connections -x
fw tab -t fwx_alloc -x
fw tab -t connections -x
CheckPoint Log Buffer Full
1. Create or modify (if the file exists) the $FWDIR/boot/modules/fwkern.conf file on the Security gateway.
2. Add the entry fw_log_bufsize=xxxxx, where xxxx is the desired size in bytes (default = 81920) - try to set it to 163840.
3. Reboot the Security gateway
Add the following to fwstart.conf:
----
$FWDIR/bin/fw ctl debug -buf 8192
fw ctl kdebug -f > /var/log/console.log &
echo "fw debug messages go to /var/log/console.log"
2. Add the entry fw_log_bufsize=xxxxx, where xxxx is the desired size in bytes (default = 81920) - try to set it to 163840.
3. Reboot the Security gateway
Add the following to fwstart.conf:
----
$FWDIR/bin/fw ctl debug -buf 8192
fw ctl kdebug -f > /var/log/console.log &
echo "fw debug messages go to /var/log/console.log"
IPSO CLISH Interface Examples
clish - interface command examples:
set interface eth1 speed 100M duplex full auto-advertise on
add interface eth1c0 address 12.12.12.12/28 enable
delete interface eth-s1p2c0 address 12.12.12.12
delete interface eth4c0 address 12.12.12.12
set static-route default nexthop gateway address 12.12.12.11 priority 1 on
set interface eth1 speed 100M duplex full auto-advertise on
add interface eth1c0 address 12.12.12.12/28 enable
delete interface eth-s1p2c0 address 12.12.12.12
delete interface eth4c0 address 12.12.12.12
set static-route default nexthop gateway address 12.12.12.11 priority 1 on
How to deal with CheckPoint Certificate if it is Expired
CheckPoint devices in the above, the default installation SecurePlatform OS, it will have a 5-year effective RootCA.
So next step is to talk about is how this deal expired CA!
Cause problems:
SmartDashboard Can not log SmartDashboard
Resolution:
Step 1. Adjust the system time to expire before (not a complete solution solution)
Step 2. Reload (it will be killed)
Step 3. Reset RootCA Reset this RootCA
Next to that is the third of the solution:
1: Before you begin, I briefly describe what the test environment operation
Site To Site VPN → The environment has been pre-set Site To Site VPN
Site to Site VPN – Therefore, we should first remove the Site to Site VPN settings on the device!
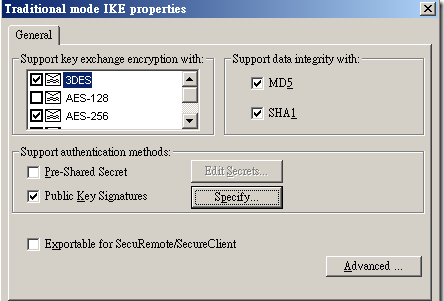
2. Traditional mode configuration Public key sign Cancel Traditional mode configuration in the Public key sign
3. Remove Root CA CA Remove pre-built Root CA (the so-called date CA)

Step2: Next Console or SSH to log into the system, the implementation of fwm sic_reset
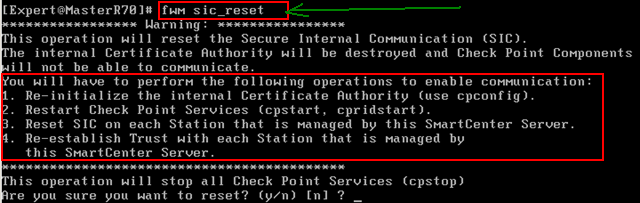

Step3: ok, then we need to generate a certificate authority, perform cpconfig, select 7

Step4: fwm sic_reset done before because when the service is disabled, so the implementation of cpstart, cpridstart restart the service


Step5: After re-login SmartDashBoard there is such a message, this is normal
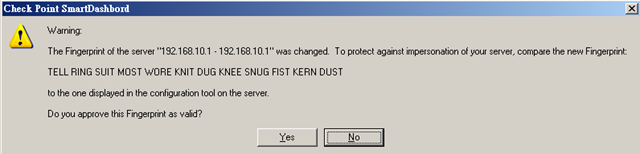
Step6: After re-login, we need to produce CA to the VPN, and therefore the press Add

Step7: given name, by Generate will generate a certificate

Step8: Do not forget to come back just to cancel the setting, including a VPN set Oh!
So next step is to talk about is how this deal expired CA!
Cause problems:
SmartDashboard Can not log SmartDashboard
Resolution:
Step 1. Adjust the system time to expire before (not a complete solution solution)
Step 2. Reload (it will be killed)
Step 3. Reset RootCA Reset this RootCA
Next to that is the third of the solution:
1: Before you begin, I briefly describe what the test environment operation
Site To Site VPN → The environment has been pre-set Site To Site VPN
Site to Site VPN – Therefore, we should first remove the Site to Site VPN settings on the device!
2. Traditional mode configuration Public key sign Cancel Traditional mode configuration in the Public key sign
3. Remove Root CA CA Remove pre-built Root CA (the so-called date CA)

Step2: Next Console or SSH to log into the system, the implementation of fwm sic_reset


Step3: ok, then we need to generate a certificate authority, perform cpconfig, select 7

Step4: fwm sic_reset done before because when the service is disabled, so the implementation of cpstart, cpridstart restart the service


Step5: After re-login SmartDashBoard there is such a message, this is normal

Step6: After re-login, we need to produce CA to the VPN, and therefore the press Add

Step7: given name, by Generate will generate a certificate

Step8: Do not forget to come back just to cancel the setting, including a VPN set Oh!

How to delete manually a license for Checkpoint
The file that contains the licenses is located here:
$CPDIR/conf/cp.license
Find the block of three lines that contain the license you want to remove, and delete that block.
$CPDIR/conf/cp.license
Find the block of three lines that contain the license you want to remove, and delete that block.
Troubleshooting Checkpoint VPNS with IKEVIEW
Using IKEVIEW for VPN debugging
IKEVIEW is a Checkpoint Partner tool available for VPN troubleshooting purposes. It is a Windows executable that can be downloaded from Checkpoint.com. Ikeview was originally only available to Checkpoint's CSP partners however they will gladly supply you a copy of thie file if you have a licensed Checkpoint product. This file parses the IKE.elg file located on the firewall.
To use IKEVIEW for VPN troubleshooting do the following:
1. From the firewall type the following:
vpn debug ikeon
This will create the IKE.elg file located in $FWDIR/log
2. Attempt to establish the VPN tunnel. All phases of the connection will be logged to the IKE.elg file.
3. SCP the file to your local desktop.
WINSCP works great
4. Launch IKEVIEW and select File>Open. Browse to the IKE.elg file.
Understanding the IKE.elg output
All Phase I packets will either be labeled Main Mode or Aggressive Mode.
Phase II packets will be labeled QM or Quick Mode.
An arrow pointing to the left (<) indicates IPSEC packets that the Checkpoint firewall (local) receives from the remote Peer. An arrow pointing to the right (>) represent IPSEC packets that the Checkpoint firewall is sending to the remote peer.
Ikeview Phase I Main Mode exchange:
If your encryption fails in Main Mode Packet 1, then you need to check your VPN proposal (encryption/hash/lifetime).
Packet 2 ( MM Packet 2 in the trace ) is from the responder to agree on one encryption and hash algorithm
Packets 3 and 4 aren’t usually used when troubleshooting. They perform key exchanges and include a large number called a NONCE. The NONCE is a set of never before used random numbers sent to the other part, signed and returned to prove the parties identity.
Packets 5 and 6 perform the authentication between the peers. The peers IP address shows in the ID field under MM packet 5. Packet 6 shows that the peer has agreed to the proposal and has authorised the host initiating the key exchange.
If your encryption fails in Main Mode Packet 5, then you need to check the authentication - Certificates or pre-shared secrets
Phase I Main Mode example:
In the example below, we see that Phase I is failing after the first packet (Main mode Phase I takes 6 packets to complete). After the first packet (the initial proposal packet), we see that the remote peer responds with No Proposal Chosen. In this example, the remote peer rejected the local proposal of AES/SHA1 with a lifetime of 86400 seconds and the provided Preshared key.
 Phase II Quick Mode exchange:
Next is Phase II - the IPSec Security Associations (SAs) are negotiated, the shared secret key material used for the SA is determined and there is an additional DH exchange. Phase II failures are generally due to a misconfigured VPN domain. Phase II occurs in 3 stages:
1. Peers exchange key material and agree encryption and integrity methods for IPSec.
2. The DH key is combined with the key material to produce the symmetrical IPSec key.
3. Symmetric IPSec keys are generated.
In IkeView under the IP address of the peer, expand Quick Mode packet 1:
> "P2 Quick Mode ==>" for outgoing or "P2 Quick Mode <==" for incoming > QM Packet 1
> Security Association
> prop1 PROTO_IPSEC_ESP
> tran1 ESP_AES (for an AES encrypted tunnel)
You should be able to see the SA life Type, Duration, Authentication Alg, Encapsulation Mode and Key length.
If your encryption fails here, it is one of the above Phase II settings that needs to be looked at.
There are two ID feilds in a QM packet. Under
> QM Packet 1
> ID
You should be able to see the initiators VPN Domain configuration including the type (ID_IPV4_ADDR_SUBNET) and data (ID Data field).
Under the second ID field you should be able to see the peers VPN Domain configuration.
Packet 2 from the responder agrees to its own subnet or host ID, encryption and hash algorithm.
Packet 3 completes the IKE negotiation.
Phase II Quick Mode example:
Below is a screenshot of a failed VPN connection for Phase II. From this example, we can see that Phase I(Main Mode) completed successfully. Phase II (Quick Mode) shows a Failed status.
As indicated below, there is an Outgoing proposal (local peer) for AES/SHA1 with a lifetime of 3600 seconds. After the failed Phase II packet, there is an Info packet from the remote peer indicating “Invalid ID Information”. This is an indication that the remote peer rejected our proposal. If the tunnel were being initiated on the Remote End, we would also see the remote peer’s proposal and can compare that to the local proposal.

Common errors indicated in Ikeview
No Proposal Chosen:
A common error that can be easily identified in IKEVIEW is “No Proposal Chosen”.
In the Quick Mode section that is followed by the info line displaying the “No Proposal Chosen” message should display the network mask used for the VPN handshake. Compare the mask used in the local encryption domain with the mask sent by the remote peer. This is a common error when establishing tunnels with non-Checkpoint firewalls. Checkpoint, by default, supernets networks contained in the encryption domain. The method for resolving this issue on the Checkpoint firewall differs depending on if the firewall is R55, R61 simple mode, or R61 classic mode. In R55 there is an option in the VPN section of the Interoperable firewall object that tells the Firewall for “One tunnel per pair of hosts, or one tunnel per pair of subnets”. In R61 Simple mode, there is an option in the VPN Community that says “exchange key per host”. In R61 Classic mode you will need to do the following during non-business hours:
CP Stop
Modify the $FWDIR/lib/user.def.
Change the parameter "IKE_largest_possible_subnet" from true to "false".
CP start.
Aggressive Mode failure:
Aggressive mode uses 3 packets instead of 6 during the Phase I negotiations. Therefore if 1 side of the tunnel is configured for Aggressive Mode and the other side is configured for Main Mode, the 2 peers will not agree with the contents of the first packet during the exchange. If the local peer is mistakenly configured to use Aggressive Mode (which is a less secure method), the outgoing packet will be labeled Aggressive Mode.
Invalid ID-Information:
This is an indication that the remote peer rejected either the Phase I or Phase II proposal from the local peer.
PROTO_IPCOMP in the QM packet
This is an indication that IP Compression is enabled for this tunnel.
IKEVIEW is a Checkpoint Partner tool available for VPN troubleshooting purposes. It is a Windows executable that can be downloaded from Checkpoint.com. Ikeview was originally only available to Checkpoint's CSP partners however they will gladly supply you a copy of thie file if you have a licensed Checkpoint product. This file parses the IKE.elg file located on the firewall.
To use IKEVIEW for VPN troubleshooting do the following:
1. From the firewall type the following:
vpn debug ikeon
This will create the IKE.elg file located in $FWDIR/log
2. Attempt to establish the VPN tunnel. All phases of the connection will be logged to the IKE.elg file.
3. SCP the file to your local desktop.
WINSCP works great
4. Launch IKEVIEW and select File>Open. Browse to the IKE.elg file.
Understanding the IKE.elg output
All Phase I packets will either be labeled Main Mode or Aggressive Mode.
Phase II packets will be labeled QM or Quick Mode.
An arrow pointing to the left (<) indicates IPSEC packets that the Checkpoint firewall (local) receives from the remote Peer. An arrow pointing to the right (>) represent IPSEC packets that the Checkpoint firewall is sending to the remote peer.
Ikeview Phase I Main Mode exchange:
If your encryption fails in Main Mode Packet 1, then you need to check your VPN proposal (encryption/hash/lifetime).
Packet 2 ( MM Packet 2 in the trace ) is from the responder to agree on one encryption and hash algorithm
Packets 3 and 4 aren’t usually used when troubleshooting. They perform key exchanges and include a large number called a NONCE. The NONCE is a set of never before used random numbers sent to the other part, signed and returned to prove the parties identity.
Packets 5 and 6 perform the authentication between the peers. The peers IP address shows in the ID field under MM packet 5. Packet 6 shows that the peer has agreed to the proposal and has authorised the host initiating the key exchange.
If your encryption fails in Main Mode Packet 5, then you need to check the authentication - Certificates or pre-shared secrets
Phase I Main Mode example:
In the example below, we see that Phase I is failing after the first packet (Main mode Phase I takes 6 packets to complete). After the first packet (the initial proposal packet), we see that the remote peer responds with No Proposal Chosen. In this example, the remote peer rejected the local proposal of AES/SHA1 with a lifetime of 86400 seconds and the provided Preshared key.
 Phase II Quick Mode exchange:
Next is Phase II - the IPSec Security Associations (SAs) are negotiated, the shared secret key material used for the SA is determined and there is an additional DH exchange. Phase II failures are generally due to a misconfigured VPN domain. Phase II occurs in 3 stages:
1. Peers exchange key material and agree encryption and integrity methods for IPSec.
2. The DH key is combined with the key material to produce the symmetrical IPSec key.
3. Symmetric IPSec keys are generated.
In IkeView under the IP address of the peer, expand Quick Mode packet 1:
> "P2 Quick Mode ==>" for outgoing or "P2 Quick Mode <==" for incoming > QM Packet 1
> Security Association
> prop1 PROTO_IPSEC_ESP
> tran1 ESP_AES (for an AES encrypted tunnel)
You should be able to see the SA life Type, Duration, Authentication Alg, Encapsulation Mode and Key length.
If your encryption fails here, it is one of the above Phase II settings that needs to be looked at.
There are two ID feilds in a QM packet. Under
> QM Packet 1
> ID
You should be able to see the initiators VPN Domain configuration including the type (ID_IPV4_ADDR_SUBNET) and data (ID Data field).
Under the second ID field you should be able to see the peers VPN Domain configuration.
Packet 2 from the responder agrees to its own subnet or host ID, encryption and hash algorithm.
Packet 3 completes the IKE negotiation.
Phase II Quick Mode example:
Below is a screenshot of a failed VPN connection for Phase II. From this example, we can see that Phase I(Main Mode) completed successfully. Phase II (Quick Mode) shows a Failed status.
As indicated below, there is an Outgoing proposal (local peer) for AES/SHA1 with a lifetime of 3600 seconds. After the failed Phase II packet, there is an Info packet from the remote peer indicating “Invalid ID Information”. This is an indication that the remote peer rejected our proposal. If the tunnel were being initiated on the Remote End, we would also see the remote peer’s proposal and can compare that to the local proposal.

Common errors indicated in Ikeview
No Proposal Chosen:
A common error that can be easily identified in IKEVIEW is “No Proposal Chosen”.
In the Quick Mode section that is followed by the info line displaying the “No Proposal Chosen” message should display the network mask used for the VPN handshake. Compare the mask used in the local encryption domain with the mask sent by the remote peer. This is a common error when establishing tunnels with non-Checkpoint firewalls. Checkpoint, by default, supernets networks contained in the encryption domain. The method for resolving this issue on the Checkpoint firewall differs depending on if the firewall is R55, R61 simple mode, or R61 classic mode. In R55 there is an option in the VPN section of the Interoperable firewall object that tells the Firewall for “One tunnel per pair of hosts, or one tunnel per pair of subnets”. In R61 Simple mode, there is an option in the VPN Community that says “exchange key per host”. In R61 Classic mode you will need to do the following during non-business hours:
CP Stop
Modify the $FWDIR/lib/user.def.
Change the parameter "IKE_largest_possible_subnet" from true to "false".
CP start.
Aggressive Mode failure:
Aggressive mode uses 3 packets instead of 6 during the Phase I negotiations. Therefore if 1 side of the tunnel is configured for Aggressive Mode and the other side is configured for Main Mode, the 2 peers will not agree with the contents of the first packet during the exchange. If the local peer is mistakenly configured to use Aggressive Mode (which is a less secure method), the outgoing packet will be labeled Aggressive Mode.
Invalid ID-Information:
This is an indication that the remote peer rejected either the Phase I or Phase II proposal from the local peer.
PROTO_IPCOMP in the QM packet
This is an indication that IP Compression is enabled for this tunnel.
How To Perform a SecurePlatform Firewall Health Check Part 2
Checking dmesg and the Messages File
The output of the dmesg command and the /var/log/messages file should be examined for tell-tale messages:
‘Neighbour table overflow’
If this message is seen it indicates that the default limit of the kernel ARP cache (1024) is set too low. This will only occur if there is a large subnet connected directly to the firewall or cluster. If the message is seen it is possible to increase the size of the table by editing the /etc/sysctl.conf file to include the lines:
This will increase the ARP cache to 4096 after the firewall has been re-booted.
‘FW-1: State synchronization is in risk. Please examine your synchronization network to avoid further problems!’
If this message is seen it indicates that there is an issue with the state synchronization network which can impede network performance. Consult the „State Synchronization‟ section in the „Firewall Application Checks‟ for further information.
By default all services are state synchronized but some services do not need syncing and may cause excessive load on the sync network (e.g. DNS). Disable state sync for all short lived connections and/or services which don‟t require state full failover.
‘FW-1: SecureXL: Connection templates are not possible for the installed policy (network quota is active). Please refer to the documentation for further details.'
If this message is seen it indicates that there is a SmartDefense option active (in this case „network quota‟) that has disabled templating of connections in SecureXL. Disabling SecureXL templates restricts the performance of SecureXL and is therefore undesirable. In this case, disabling the „network quota‟ option would restore the ability to produce templates and increase the performance of the firewall.
‘Out of Memory: Killed process ()’
If this message is seen it means there is no more memory available in the user space. As a result, SecurePlatform starts to kill processes.
From time to time other messages of a similar nature may appear in dmesg, the /var/log/messages file and on the console. It is always a good idea to research the message in the Check Point Secure Knowledge if you are unsure of the meaning.
For further information see: sk33219: Critical error messages and logs

The output of the dmesg command and the /var/log/messages file should be examined for tell-tale messages:
‘Neighbour table overflow’
If this message is seen it indicates that the default limit of the kernel ARP cache (1024) is set too low. This will only occur if there is a large subnet connected directly to the firewall or cluster. If the message is seen it is possible to increase the size of the table by editing the /etc/sysctl.conf file to include the lines:
net.ipv4.neigh.default.gc_thresh1 = 1024
net.ipv4.neigh.default.gc_thresh2 = 2048
net.ipv4.neigh.default.gc_thresh3 = 4096
net.ipv4.neigh.default.gc_thresh2 = 2048
net.ipv4.neigh.default.gc_thresh3 = 4096
This will increase the ARP cache to 4096 after the firewall has been re-booted.
‘FW-1: State synchronization is in risk. Please examine your synchronization network to avoid further problems!’
If this message is seen it indicates that there is an issue with the state synchronization network which can impede network performance. Consult the „State Synchronization‟ section in the „Firewall Application Checks‟ for further information.
By default all services are state synchronized but some services do not need syncing and may cause excessive load on the sync network (e.g. DNS). Disable state sync for all short lived connections and/or services which don‟t require state full failover.
‘FW-1: SecureXL: Connection templates are not possible for the installed policy (network quota is active). Please refer to the documentation for further details.'
If this message is seen it indicates that there is a SmartDefense option active (in this case „network quota‟) that has disabled templating of connections in SecureXL. Disabling SecureXL templates restricts the performance of SecureXL and is therefore undesirable. In this case, disabling the „network quota‟ option would restore the ability to produce templates and increase the performance of the firewall.
‘Out of Memory: Killed process
If this message is seen it means there is no more memory available in the user space. As a result, SecurePlatform starts to kill processes.
From time to time other messages of a similar nature may appear in dmesg, the /var/log/messages file and on the console. It is always a good idea to research the message in the Check Point Secure Knowledge if you are unsure of the meaning.
For further information see: sk33219: Critical error messages and logs
Processes
A list of processes running on the firewall can be displayed with the following commands:
top
ps auxw
Use the ‘top’ command to check if any process is hogging CPU or Memory and to see if there are any
Zombie processes.
Example output:
[Expert@Zulu]# top
09:46:44 up 24 days, 9:40, 1
user, load average: 0.30, 0.19, 0.14
55 processes: 50
sleeping, 2 running, 3 zombie, 0 stopped
CPU states: cpu
|
user
|
nice
|
system
|
irq
|
softirq
|
iowait
|
idle
|
total
|
15.0%
|
0.0%
|
1.0%
|
10.0%
|
24.0%
|
0.0%
|
150.0%
|
cpu00
|
7.0%
|
0.0%
|
0.0%
|
0.0%
|
1.0%
|
0.0%
|
92.0%
|
cpu01
|
8.0%
|
0.0%
|
1.0%
|
10.0%
|
23.0%
|
0.0%
|
58.0%
|
Mem: 4091376k av, 1390028k used, 2701348k
free, 0k shrd, 90864k
buff
786476k active, 140320k
inactive
Swap: 4192944k
av, 0k used, 4192944k
free 278224k
cached
PID
1526
|
USER
root
|
PRI
25
|
NI
0
|
SIZE
97280
|
RSS
95M
|
SHARE
11396
|
STAT R
|
%CPU
15.8
|
%MEM
2.3
|
TIME
2590m
|
CPU
1
|
COMMAND
fw
|
1
|
root
|
15
|
0
|
512
|
512
|
452
|
S
|
0.0
|
0.0
|
0:17
|
0
|
init
|
2
|
root
|
RT
|
0
|
0
|
0
|
0
|
SW
|
0.0
|
0.0
|
0:00
|
0
|
migration
|
3
|
root
|
RT
|
0
|
0
|
0
|
0
|
SW
|
0.0
|
0.0
|
0:00
|
1
|
migration
|
4
|
root
|
15
|
0
|
0
|
0
|
0
|
SW
|
0.0
|
0.0
|
0:00
|
1
|
keventd
|
5
|
root
|
34
|
19
|
0
|
0
|
0
|
SWN
|
0.0
|
0.0
|
0:00
|
0
|
ksoftirqd
|
6
|
root
|
34
|
19
|
0
|
0
|
0
|
SWN
|
0.0
|
0.0
|
0:00
|
1
|
ksoftirqd
|
9
|
root
|
25
|
0
|
0
|
0
|
0
|
SW
|
0.0
|
0.0
|
0:00
|
1
|
bdflush
|
7
|
root
|
15
|
0
|
0
|
0
|
0
|
SW
|
0.0
|
0.0
|
0:10
|
0
|
kswapd
|
8
|
root
|
15
|
0
|
0
|
0
|
0
|
SW
|
0.0
|
0.0
|
0:12
|
0
|
kscand
|
10
|
root
|
15
|
0
|
0
|
0
|
0
|
SW
|
0.0
|
0.0
|
0:14
|
0
|
kupdated
|
17
|
root
|
25
|
0
|
0
|
0
|
0
|
SW
|
0.0
|
0.0
|
0:00
|
0
|
scsi_eh_0
|
22
|
root
|
15
|
0
|
0
|
0
|
0
|
SW
|
0.0
|
0.0
|
0:14
|
0
|
kjournald
|
90
|
root
|
25
|
0
|
0
|
0
|
0
|
SW
|
0.0
|
0.0
|
0:00
|
1
|
khubd
|
The above example output indicates there are 3 zombie processes but there are no resource
hogging processes. The Zombie processes should be identified to see if there is any cause for action.
Use ‘ps auxw | more’ to examine the value in the START column of the process INIT, check the START column of cpd, fwd and vpnd processes
and other
daemons to see if they have restarted since the last boot. Identify any Zombie
processes.
Example output:
[Expert@Zulu]# ps
auxw | more
USER PID %CPU %MEM VSZ RSS
TTY STAT START TIME COMMAND
root 1 0.0 0.0 1524 512
? S Jun13 0:17 init
root 731 0.0 0.0 1524 476
? S Jun13 0:00
klogd -x -c 1
root 1174 0.0 0.0 3040
1348
? S Jun13 0:00
/usr/sbin/sshd -4
root 1212 0.0 0.0 1572 620
? S Jun13 0:00
crond
root 1265 0.0 0.0 2724 904
? S Jun13 0:00
/bin/sh
/opt/spwm/bin/cpwmd_wd
root 1269 0.0 0.1
34412 7348
? S Jun13 0:18
cpwmd -D -app SPLATWebUI
root 1389 0.0 0.1 7948
4608
? S Jun13 0:00
/opt/CPshrd-R65/bin/cprid
root 1402 0.0 0.0 9120
3908
? S Jun13 2:30
/opt/CPshrd-R65/bin/cpwd
root 1416 0.2 4.9
331348 204012 ? S Jun13 88:42 cpd
root 1526 7.3 2.3
422392 97280 ? S Jun13 2590:42 fwd
root
|
1578
|
0.0
|
1.6
|
220252
|
66864
|
?
|
S
|
Jun13
|
0:42
|
in.asessiond 0
|
root
|
1579
|
0.0
|
1.6
|
220220
|
66800
|
?
|
S
|
Jun13
|
0:43
|
in.aufpd 0
|
root
|
1580
|
0.1
|
1.7
|
240988
|
69844
|
?
|
S
|
Jun13
|
57:51
|
vpnd 0
|
root
|
1586
|
0.2
|
0.1
|
11508 6172 ?
|
S
|
Jun13
|
95:09
|
dtlsd 0
|
||
root
|
1680
|
0.0
|
2.0
|
273760 82716
|
?
|
S
|
Jun13
|
15:20
|
rtmd
|
|
No daemons in the ps auxw output have restarted.
Any daemon processes that have restarted may not necessarily indicate
a fault because somebody may
have
restarted it, for example by performing cpstop;cpstart. Normally the cause of a process restart can be determined by looking at the /var/log/messages file or by examining the daemon‟s error log file (cpd.elg, fwd.elg, vpnd.elg etc).
In the above example of ‘top’ output there were 3 Zombie processes. Zombie processes do not consume resources but should not be present. Check the process list to identify the Zombie (Stat: z) processes and determine if action is required.
[Expert@Zulu]# ps
auxw | more
USER PID %CPU %MEM VSZ RSS
TTY STAT START TIME COMMAND
root
|
18374
|
0.5
|
0.0
|
4680
|
1932 ttyp0
|
S
|
09:46
|
0:00 cpinfo
-n -z -o BCCF-CWH-EXT.cpinfo
|
root
|
18399
|
0.0
|
0.0
|
0
|
0 ttyp0
|
Z
|
09:46
|
0:00 [cpprod_util
|
root
|
18403
|
0.2
|
0.0
|
0
|
0 ttyp0
|
Z
|
09:46
|
0:00 [cpprod_util
|
root
|
18413
|
0.4
|
0.0
|
0
|
0 ttyp0
|
Z
|
09:46
|
0:00 [cpprod_util
|
The process „cpprod_util‟ was called by a process used by CPinfo to gather Ethernet stats. The „Zombie‟ process is also marked „defunct‟ which means the same as „Zombie‟. A defunct or Zombie process is a process that has finished but still depends on a „parent‟ which is still alive. After the completion and
termination of the parent process
these Zombie processes should terminate and no longer be shown in the process list.
If the Zombie processes
are still there after completion of the CPinfo, killing
the parent process will be required to remove them from the process list.
Sometimes Zombie processes
are the result of
an error in the daemon coding. For example if a
Zombie vpnd process is seen there is a hotfix for it,
refer to:
sk33941: "Zombie" vpnd process
Capacity Optimization
The maximum number of concurrent connections that a firewall can
handle is configured in the Capacity Optimization section
of the firewall
or cluster object. It is recommended under normal circumstances to use
the „automatic hash table size and memory pool‟ configuration when increasing or decreasing the number of maximum concurrent connections (default 25,000).
To check what value the maximum number
of concurrent connections has been set to either check the setting in the GUI firewall/cluster object or run the following command on the firewall:
fw tab –t connections | grep limit
Example output:
[Expert@Zulu] #fw tab –t connections | grep limit
dynamic, id 8158, attributes: keep, sync, aggressive aging, expires 25, refresh, limit 100000, hashsize 534288, kbuf 17 18 19 20 21 22 23 24 25
26 27 28 29 30 31, free function c0b98510 0, post sync handler c0b9a370
The number (100000) directly after ‘limit’ is the maximum value
as set in the „Capacity Optimization‟
page
on the firewall or cluster object (GUI).
To check the number
of concurrent connections
(#VALS) and the peak value (#PEAK) use the following command on the firewall:
fw tab –t connections –s
Example output:
[Expert@Zulu]# fw tab –t connections -s
HOST NAME ID #VALS #PEAK #SLINKS
localhost connections 8158 23055 77921 29141
[Expert@Zulu]#
The values that
we are interested in are the „limit‟ and „peak‟ values. Ensure that there is about 15-20%
headroom before Aggressive Ageing is activated to ensure there is adequate spare capacity in the connections table to cope
with an increase in connections. If necessary, change the value in the capacity optimization section on the firewall
object and push the policy to make it effective. Greatly over-prescribing
the maximum concurrent connections is not recommended as it can lead to inefficient use of memory.
In the above example, a maximum of 100,000 concurrent connections has
been set in the
Capacity Optimization section for the firewall and the peak number
of connections (#PEAK) was
77,921 over the last 124 days (uptime).
The headroom above the #PEAK is set too low because the Aggressive Ageing default threshold of 80% will
be activated
at 80,000. Increase the concurrent connections limit to around
120,000 connections to give
between 15-20% head-room before Aggressive Ageing becomes active.
If NAT is performed on the module check the fwx_cache table using the command:
fw tab –t fwx_cache -s
Example output:
[Expert@Zulu]# fw tab –t fwx_cache -s
HOST NAME ID #VALS #PEAK #SLINKS
localhost fwx_cache 8116 10000 10000 0
[Expert@Zulu]#
In the above example,
the value of #PEAK is equal to 10,000 it indicates that the
NAT cache table (default 10,000) was full
at some time. (#VALS equal to 10,000 indicates that the NAT cache table is still full.)
For improved NAT cache performance the size of the NAT cache should be increased or the time entries are held in the table decreased. For further information see:
sk21834: How to modify the values of the properties related to the NAT cache table
ClusterXL and State Synchronization
The health of ClusterXL can be examined using
a number of different commands:
cphaprob –a if cphaprob state cphaprob list
cpstat ha –f all | more
fw ctl pstat
Use the ‘cphaprob –a if’ command on the cluster members to check which interfaces have been configured for state synchronization and verify the sync mode is consistent on the cluster members:
Example output:
[Expert@Zulu]# cphaprob –a if eth1c0 non sync(non secured) eth2c0 non
sync(non secured) eth3c0 non sync(non secured) eth4c0 sync(secured), multicast
Virtual cluster interfaces: 3
eth1c0 192.168.1.1
eth2c0 192.168.2.1
eth3c0 10.1.1.1 [Expert@Zulu]#
[Expert@Shaka]# cphaprob –a if
eth1c0 non sync(non secured) eth2c0 non sync(non secured) eth3c0 non sync(non secured) eth4c0 sync(secured), broadcast
Virtual cluster interfaces: 3
eth1c0 192.168.1.1
eth2c0 192.168.2.1
eth3c0 10.1.1.1 [Expert@Shaka]#
In the above example, interface eth4c0 has been configured on both cluster members for state sync but the sync mode is inconsistent, one is using multicast and the other broadcast mode. Ensure the cluster members use the same mode. (The default mode is multicast.)
The following document explains how to change between broadcast and multicast
mode:
sk20576: How
to set ClusterXL Control Protocol (CCP) in broadcast mode in ClusterXL
Use the ‘cphaprob state’ command to check if state sync is up and running. The local and remote state synchronization IP addresses should be displayed and their state should be shown as ‘Active’ on the HA Master and ‘Standby’ on the HA Backup.
In a load-sharing
cluster the state should be shown as
‘Active’ on both the local and remote firewalls:
Example output
- HA:
[Expert@Zulu]# cphaprob state
Cluster Mode: New High Availability (Active Up)
Number
|
Unique Address
|
Assigned
|
Load
|
State
|
1 (local)
|
1.1.1.1
|
100%
|
Active
|
|
2
|
1.1.1.2
|
0%
|
Standby
|
[Expert@Zulu]#
In a HA cluster configuration (above), one member should be Active and the other Standby.
Example output – Load-Sharing:
[Expert@Dingaan]# cphaprob state
Cluster Mode: New High Availability (Active Up)
Number
|
Unique Address
|
Assigned
|
Load
|
State
|
1 (local)
|
1.1.1.3
|
50%
|
Active
|
|
2
|
1.1.1.4
|
50%
|
Active
|
[Expert@Dingaan]#
In a load-sharing cluster configuration (above), both members should be shown as Active.
Example output – HA or Load-Sharing:
[Expert@Zulu]# cphaprob state
Cluster Mode: New High Availability (Active Up)
Number Unique Address Assigned Load State
1 (local) 1.1.1.1 100% Active
[Expert@Zulu]#
Remote cluster partner is missing!
If the remote partner is not shown it will be usually be due to one of the following:
· There is no network connectivity between the members of the cluster on the state sync network
· The partner does not have state synchronization enabled
· One partner is using
broadcast mode and the other is using multicast mode
· One of the monitored processes has
an issue, such as no policy loaded
· The partner firewall is down.
Example output
- HA or Load-Sharing:
[Expert@Zulu]# cphaprob state
Cluster Mode: New High Availability (Active Up)
Number
|
Unique Address
|
Assigned
|
Load
|
State
|
1 (local)
|
1.1.1.1
|
100%
|
Active
|
|
2
|
1.1.1.2
|
0%
|
Ready
|
[Expert@Zulu]#
Partner is in the ‘Ready’ state. If one of the partners is in the ‘Ready’ state it indicates that there is an issue with state synchronization.
The ‘Ready’ state is normally caused by another member of the cluster running
a higher version of code or HFA, for example, as would happen
during
an upgrade. This state is also seen when CoreXL has been configured to use a different number
of cores on the individual cluster members.
For further information see:
sk42096: Cluster member with CoreXL is in 'Ready' state
The ‘Ready’ state can also occur if a cluster member receives state synchronization
traffic from a different cluster that is using the same mac magic number
and the
other cluster is running a higher version of code. For further information see:
sk36913: Connecting several clusters on the same network
Example output
- HA or Load-Sharing:
[Expert@Zulu]# cphaprob state
Cluster Mode: New High Availability (Active Up)
Number
|
Unique Address
|
Assigned
|
Load
|
State
|
1 (local)
|
1.1.1.1
|
100%
|
Active
|
|
2
|
1.1.1.2
|
0%
|
Down
|
[Expert@Zulu]#
A remote cluster member is in the ‘Down’ state indicates
that there is either a problem on the remote member or the state synchronization network between the cluster members is broken.
To investigate why a member shows itself to be locally ‘Down’ use the ‘cpstat ha –f all | more’ command on the firewall that shows ‘Down’. This command displays the „Problem Notification Table‟ and the state of health of the monitored
processes:
Example output (truncated):
[Expert@Zulu]# cpstat ha –f all | more
Problem Notification table
-------------------------------------------------
|Name |Status |Priority|Verified|Descr|
-------------------------------------------------
|Synchronization|OK | 0| 3383| |
|Filter
|
|OK
|
|
|
0|
|
3383|
|
|
|
|cphad
|
|OK
|
|
|
0|
|
0|
|
|
|
|fwd
|
|OK
|
|
|
0|
|
0|
|
|
|
-------------------------------------------------
All monitored processes have the ‘OK’ status.
Example output (truncated):
[Expert@Shaka]# cpstat ha –f all | more
Problem Notification table
-------------------------------------------------
|Name |Status |Priority|Verified|Descr|
-------------------------------------------------
|Synchronization|problem| 0| 3383| |
|Filter |problem| 0| 3383| |
|cphad |OK | 0| 0| |
|fwd |OK | 0| 0| |
-------------------------------------------------
State synchronization is in a problem state because the policy is unloaded on this cluster member. Installing the policy will fix
this issue.
Alternatively, the ‘cphaprob list’ command displays the same information plus some additional details:
Example output:
[Expert@Zulu]# cphaprob list
Registered Devices:
Device Name: Synchronization
Registration number: 0
Timeout: none
Current state: OK
Time since last report: 12139.6 sec
Device Name: Filter
Registration number: 1
Timeout: none
Current state: OK
Time since last report: 12124.5 sec
Device Name: cphad
Registration number: 2
Timeout: 5 sec
Current state: OK
Time since last report: 0.6 sec
Device Name: fwd
Registration number: 3
Timeout: 5 sec
Current state: OK
Time since last report: 0.6 sec
All monitored processes
are shown
as ‘OK’.
Assuming that state synchronization on the cluster is healthy, use the following command to check if the state tables are synchronized:
fw tab –t connections –s
Simultaneously execute the command on both cluster members; compare the values
of #VALS. The values on both firewalls should be similar if the state synchronization mechanism is working unless
a lot of delayed notification is in use.
Example output:
[Expert@Zulu]# fw tab –t connections -s
HOST NAME ID
#VALS #PEAK #SLINKS
localhost connections 8158 3222 38026 9820 [Expert@Zulu]#
[Expert@Shaka]# fw tab –t connections -s
HOST NAME ID #VALS #PEAK #SLINKS
localhost connections 8158 3187 38026 9808 [Expert@Shaka]#
The #PEAK may be different depending on the uptime and when the last peak number of connections occurred.
The #VALS on a
HA pair should always be similar.
Examine the output of
the sync section of ‘fw ctl pstat’.
Example output:
Sync: Version: new
Status: Able to Send/Receive sync packets
Sync packets sent:
total : 13880231, retransmitted : 5, retrans reqs : 524, acks : 70
Sync packets received:
total : 692409645, were queued : 720, dropped by net : 517
retrans reqs : 5, received 43019 acks
retrans reqs for illegal seq : 0
dropped updates as a result of sync overload: 0
Callback statistics: handled 42940 cb, average delay : 1, max delay : 4
If the „dropped by net‟ counter has incremented then some sync
packets have been lost and the
problem
needs
to be investigated to find the cause.
For further information please refer to:
sk34476: Explanation of Sync section in
the output of fw ctl pstat command
SecureXL
For optimum gateway performance SecureXL needs to be enabled, the SmartDefense and Web-Intelligence or IPS options
that are enforced do not interfere
with SecureXL and the extent that templating is performed
is maximized by careful rulebase ordering.
For further information, refer to:
sk42401: Factors that adversely affect performance in
SecureXL
The following command can be used to determine that SecureXL is turned on and the creation of templates
has not been disabled:
fwaccel stat
Example output showing SecureXL turned on and templating is enabled:-
[Expert@Zulu]# fwaccel stat Accelerator
Status : on Accept Templates : on
Accelerator Features : Accounting, NAT, Cryptography, Routing,
HasClock, Templates, VirtualDefrag, GenerateIcmp,
IdleDetection, Sequencing, TcpStateDetect, AutoExpire,
DelayedNotif, McastRouting,
WireMode
Cryptography Features : Tunnel, UDPEncapsulation, MD5, SHA1, NULL,
3DES, DES, AES-128, AES-256, ESP, LinkSelection,
DynamicVPN, NatTraversal, EncRouting
[Expert@Zulu]#
If SecureXL is disabled it can be turned on from ‘cpconfig’.
Note: SecureXL is incompatible with FloodGate and will be disabled if FloodGate is active.
The following command can be used to examine the SecureXL statistics to get an understanding on how well SecureXL is configured and performing:
fwaccel stats
Examine the output of ‘fwaccel stats’:
· Check that templates are being created – this number rises
and falls as templates are created and expire.
· Examine the ratio of F2F packets to packets being accelerated - for best performance the firewall should be accelerating the majority of the packets; the amount of
packets being forwarded to the firewall (F2F) should be minimal.
Example output showing the SecureXL statistics:-

Templates
are being formed and only a small amount of F2F packets to accel packets.
Aggressive Ageing
Aggressive Aging helps manage
the connections table capacity and memory consumption of the firewall to increase durability and stability; allowing the gateway machine to handle large amounts of unexpected traffic, especially during a Denial of Service attack.
Aggressive Aging
uses short timeouts called aggressive timeouts. When a connection is idle for more than its aggressive timeout it is marked as "eligible for deletion". When the connections table or memory consumption reaches a certain user defined threshold (highwater mark), Aggressive Aging begins to delete “eligible for deletion” connections, until memory consumption or connections capacity decreases back to the desired level.
The user defined
thresholds
are set in the GUI for the specific protection enforced by the firewall
(SmartDefense > Network Security > Denial
of Service > Aggressive Ageing).
To check the state of Aggressive Ageing on the firewall
use the „fw ctl pstat‟ command:
Example output:
[Expert@Zulu]# fw ctl pstat | grep Aggressive
Aggressive Ageing is not active
[Expert@Zulu]#
The above output indicates that Aggressive Ageing
has been set in SmartDefense to „Protect‟ but the
thresholds have not been reached to make it aggressively close connections that are eligible for deletion.
If Aggressive Aging
has been set in SmartDefense to „Inactive‟ the output will say that
Aggressive Ageing is „disabled‟:
[Expert@Zulu]# fw ctl pstat | grep Aggressive
Aggressive Ageing is disabled
[Expert@Zulu]#
If Aggressive Aging is in Detect mode the
output will say it is „monitor only‟:
[Expert@Zulu]# fw ctl pstat | grep Aggressive
Aggressive Ageing is in monitor only
[Expert@Zulu]#
There were some issues with the Aggressive Ageing mechanism which are fixed in R65 HFA_50:
Improved SecureXL notifications to the firewall resolve a connectivity issue that occurs when the Sequence
Verifier is enabled together with
the Aggressive Aging mechanism.
Implementation: An immediate workaround is to disable either the Sequence Verifier or the Aggressive
Aging mechanism.
HFA Patching
Use the „fwm ver‟ and „fw ver –k‟ commands to inspect
the patching
on the management station
and the
firewall modules.
Check that the HFA patching on the module is the same version (HFA_50) or lower that the patching on the Provider-1 management station. The firewall module must never be patched with a higher version than the management station.
Ensure patching on cluster members is identical.
Example output: Provider-1 Management:-
[Expert@Manager]# fwm verThis is Check Point SmartCenter Server NGX (R65) HFA_50, Hotfix 650 - Build 011
Installed Plug-ins: Connectra NGX R62CM [Expert@Manager]#
Cluster:-
[Expert@Zulu]# fw ver –k
This is Check Point VPN-1(TM) & FireWall-1(R) NGX (R65) HFA_40, Hotfix
640 - Build 091
kernel: NGX (R65) HFA_40, Hotfix 640 - Build 091
[Expert@Zulu]#
[Expert@Shaka]# fw ver –k
This is Check Point VPN-1(TM) & FireWall-1(R) NGX (R65) HFA_40, Hotfix
640 - Build 091
kernel: NGX (R65) HFA_40, Hotfix 640 - Build 091
[Expert@Shaka]#
Versions
on the clustered firewalls (HFA_40) are identical and the versions are not above the
Provider-1 version (HFA_50)
Although the patching is good in the above example it is out of date. Check Point always recommends applying the latest HFA and Security Hotfixes on the SmartCenter and firewall modules.
The latest HFAs and Security Hotfix
release notes are available on the Check Point website:
http://www.checkpoint.com/downloads/latest/hfa/index.html
CPinfo Package:
For troubleshooting purposes Check Point TAC will require a CPinfo taken from the firewall and SmartCenter Server or CMA. Ensure the CPinfo package is higher than 911000023 so the full set of diagnostics from the appliance can be gathered successfully.
CPinfo version 911000023 often hangs during
gathering the firewall‟s connection tables
and produces a
truncated
output so it should be replaced
with the latest version.
The version installed on the appliance can be determined by running the following command:
cpvinfo /opt/CPinfo-10/bin/cpinfo |grep Build
Example output:
[Expert@Zulu]# cpvinfo /opt/CPinfo-10/bin/cpinfo |grep Build
Build number = 911000023
[Expert@Zulu]#
The above version is problematic and should
be upgraded.
The most up to date version of CPinfo can be downloaded using
the following link:
sk30567: The CPinfo utility